Have you ever thought about the important Facebook Posts, you daily miss due to the busy schedule or time allowance. Here, we are talking about the stuff, which you actually wants to check but the time never permits you to check it. And when you have the free time, you keep searching to find the same stuff at your Facebook Timeline without any success. The things gets more worst for the person, who keep moving on to the different devices to access his / her Facebook Profile. Has this happened with you any time ?. If Yes, then stop worrying from now onwards, as Today we are here with a perfect solution for this problem of many. Today, we will GUIDE you about How to use the “Save” feature, just introduced by the Facebook. By using this newly introduces Facebook “Save” feature, you can save Facebook Videos, Links, Places, Movies, Music for any later view in the free time. The best thing about this “Save” feature is that, everything will get saved at the Facebook server itself, people toggling between the different devices will get benefited the most from it. In addition to this, only the creator of this saved data can see the stuff, in simple word it has the much needed privacy too.
Before we proceed to demonstrate this Facebook “Save” feature, there is a manual way too for bookmarking the Facebook stuff for any later view. Let’s have a look on this manual part first.
Manual Way to Save Facebook stuff for any Future Reference.
Below are the complete easy steps to save Facebook Videos / Links / Posts.
1)- Login to your Facebook Account.
2)- Go to any post, link, video, picture or any other stuff at your Facebook Timeline.
3)- Now, look for date / time thing under the Post Title / Facebook Profile Title, Click to it. (For easy understandings, check the picture below).

4)- When you click this date / time thing, it will take you to another windows.
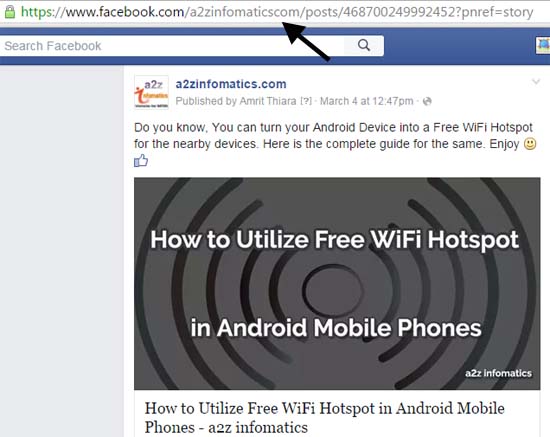
5)- That’s it, mission accomplished, Save the link showing in the address bar in any notepad file, using this link you can view the same Facebook stuff any time in the future.
We hope you have understood this manual way to bookmark any Facebook stuff completely. Believe us, this will prove more than helpful, under many special situations. Let’s move to the next section, How to use Facebook “Save” feature.
Steps to save Facebook Videos / Pictures / Posts / Links etc for Later view.
1)- Get inside to your Facebook Account.
2)- Go to the Facebook stuff (video, picture, link etc), you want to save for the later view.
3)- Look for the drop down arrow at the top-right of the desired Facebook stuff column. (Check the image below).
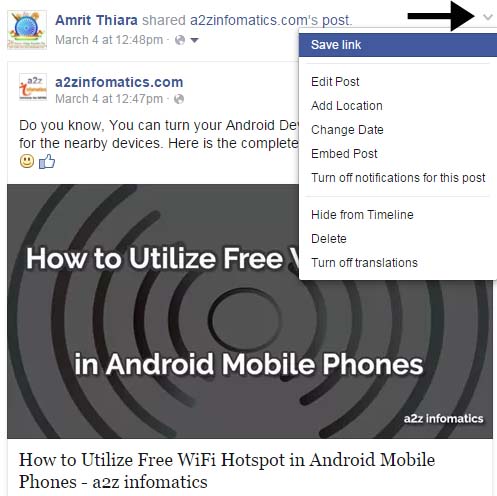
4)- Click the drop down arrow, select and HIT the “Save Post” or “Save Link” or “Save Video” or “Save Movie” or whatever you are willing to save for later view.
Note: Suffix next to the “Delete” can be Videos, Link, Post etc, relying on the type of the post you have selected to SAVE.
5)- That’s it, actually you have successfully saved the selected Facebook stuff.
Important: Here, Facebook stuff refers to the Facebook Videos, Links, Posts, Pictures or any other stuff.
How to use Facebook “Save” feature in Facebook Mobile app.
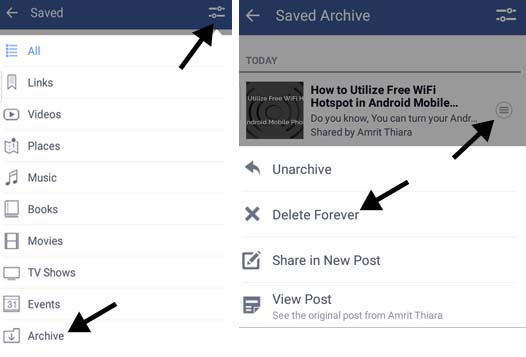
Actually, If you wants to use this Facebook “Saved feature in Facebook Mobile app, you just have to follow all the steps explained earlier in this post. To save any of the Facebook stuff, use the same drop-down arrow from the top-right of the item column. While using the Facebook Mobile app, you will only get this “Saved” option for the Videos and Links only. To view the saved items, Tap to the 3 horizontal lines at top-right of the Facebook Mobile app and get inside the “Saved” option there. The other things will remain the same for Facebook app.
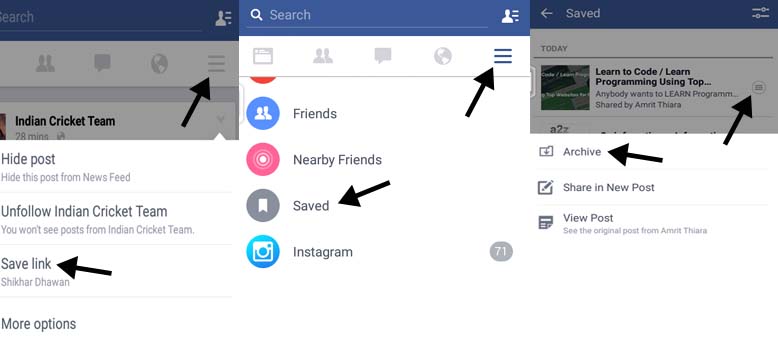
To delete any saved item from the “Saved” section, you have to archive it first. Just TAP to the 3 horizontal lines next to the saved item to archive that item. Now, go to setting bars (at top-right) on the “Saved” section, select and TAP to the “Archive” option from there, after getting inside the “Archive” section, TAP the 3 horizontal lines next to the item to delete them forever using the “Delete Forever” option.
How to view the saved Facebook stuff.
1)- Log in to your Facebook Account and move to the Home Page.
2)- Here, In the left side bar, look for the “Saved” option under the “Favorites list“.
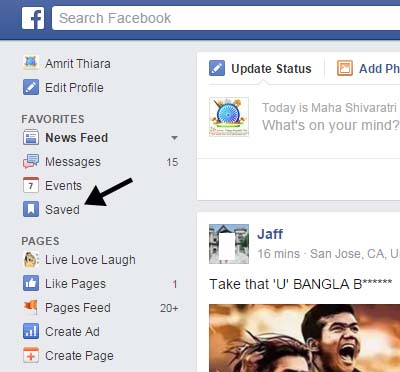
3)- Click the “Saved” option and you are with the saved stuff.
4)- The other direct way to get onto the Facebook “Saved” section is by typing “http://www.facebook.com/saved” into the browser. We hope you will HIT the Enter key yourself, after typing the direct url for the Facebook “Saved” section 🙂 .
How to delete / manage the saved Facebook stuff.
1)- Using any of the above method, get onto the Facebook “Saved” section.
2)- Here, look for the “cross” sign at top-right of the saved item column. Hit the “cross” sign to archive that item. For better understandings, check the image below.

Note: You can’t directly delete the items from the “Saved” section, you have to archive it first.
3)- Now, go to the “Archive” section from the top menu under the “Saved” heading.

4)- Here, you will find all the archived items, look for the 3 horizontal dots next to the “Share” button, click on the 3 dots.
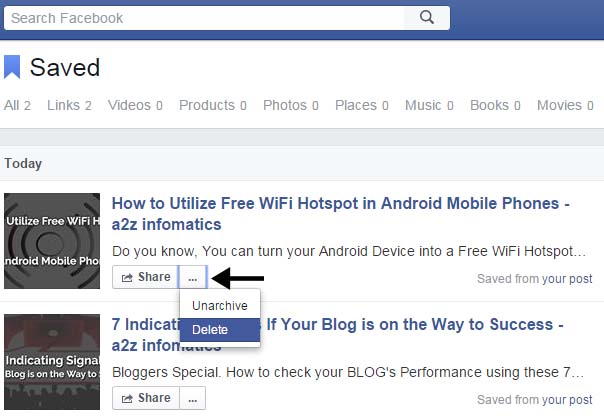
5)- Now, you will be with 2 option, unarchive and delete, Hit the delete option and the “Saved” item is permanently deleted.
We hope, you are now fully aware about managing the Facebook “Saved” items for later view.
To explain all the above doings in a single sentence, you have to save the particular Facebook item by going to the drop-down arrow mark at top-rights of the Facebook item column. This will save the Facebook item to the “Saved” section under Favorite list of the home page. You can add unlimited numbers of Facebook items to the “Saved” section for later view. To delete any of them, you first have to archive them, then by going to the archive section, you can delete any of them.
Note: Bad news for the Facebook LITE app users, the Facebook “Save” feature isn’t available in your version of the Facebook app.
Final Notes.
We hope, you are now fully aware with the Facebook “Save” feature. You can use this Facebook “Save” feature to save any facebook stuff for any later view OR future reference. The saved items can be accessed using any devices or platform. Sources has confirmed that in the future, there will be the option to share the complete “Saved” list with other users too. This is just a start for this fantastic “Save” feature, who knows, what is coming up next to the Facebook “Save” option.
That’s all we have related to save Facebook stuff. We will be back with some more useful stuff. Till then, Tata … Bye Bye. Take Good Care of Yourself & Keep visiting a2z infomatics.


